< Previous | Next | VB Tutorial | Contents >
VB Component
- In the Toolbox, Right click and a pop up menu will be shown. You choose Components…A dialog window will appear
- In the control Tab of the dialog, scroll down and find Microsoft Calendar Control. Check the checkbox and press OK
- See that the Calendar control is added to your toolbox
- In the Project Window, do Right Click and it show a pop up menu, choose Add > Form. In the dialog window, select New Tab and Form, then press Open button
- Change the Name property of the new form into frmCalendar. Change
the Caption property into Calendar.
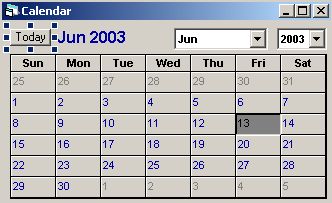
- Drag and drop Calendar Control from the Toolbox into frmCalendar. Arrange it so that look nice. For example, if the nice looking of calendar has width of 5000 and height of 4000, then we add 350 for the height of form and 50 to the width of form. Type the following code in the Form_Resize of frmCalendar to fixed the size of the Calendar form.
Private Sub Form_Resize()
Calendar1.Width = 5000
End Sub
Calendar1.Height = 4000
Me.Width = 5050
Me.Height = 4350- Add a command button into frmCalendar. Change the Name property
to cmdToday, the Caption property to Today and resize it small enough
to put in the right corner of the calendar. Type the following code
into the click event of the command button:
Private Sub cmdToday_Click()
Calendar1.Today
End Sub
- In the project window, double click MDI Form to put the MDI form in front.
- In the Menu of VB, click Tools > Menu Editor or you can use Ctrl-E. The menu Editor will appear.
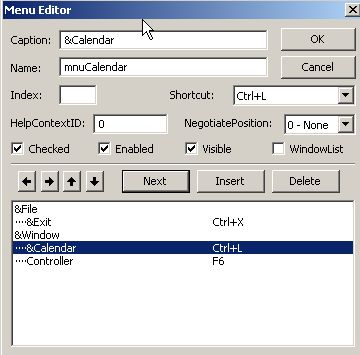
- Click the space below &Window then in the Caption, type &Calendar then in the name, type mnuCalendar . Check the Checked checkbox then click the right arrow. After that, click Next button and press OK button.
- Now in the MDI Form, you select the menu Window > Calendar and
press, then type the code below:
Private Sub mnuCalendar_Click()
If mnuCalendar.Checked = True ThenEnd Sub'now is checked, make it uncheckedElse ' now is unchecked, make it checked
frmCalendar.Hide
mnuCalendar.Checked = FalsefrmCalendar.ShowEnd If
mnuCalendar.Checked = True
- Add code below to call the Calendar Form from the MDI form at the
first time and to maximize the MDI form:
Private Sub MDIForm_Load()frmCalendar.ShowEnd Sub
MDIForm1.WindowState = vbMaximized
- Run the program. Select the menu Window > Calendar several times
to see the effect of Checked menu.
< Previous | Next | VB Tutorial | Contents >
Rate this tutorial or give your comments about this tutorial
Preferable reference for this tutorial is
Teknomo, Kardi. Visual Basic Tutorial . https:\\people.revoledu.com\kardi\ tutorial\VB