<
Previous lesson
|
Table
of Content
|
Content of this Chapter
|
Next
>
Tree Data Structure: TreeView
Visual Basic comes with many useful objects. One of them is TreeView Object that located in Microsoft Windows Common Controls 6.0 (it also contains Tab Strips, Toolbars, Status Bar, Progress Bar, List View, Slider, Image List and Image Combo).
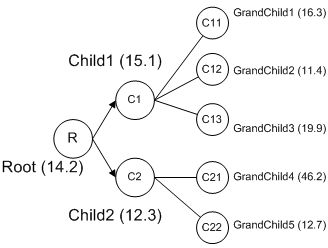
Each point location of the tree is called Node. The top level node is the root, only one root is allowed for a tree. The branch node are called child (use tvwChild relationship to add a child). You use tree data structure when you want to represent categorical data into hierarchy.
Project: Using TreeView
(
download the code here
)
We are going to assign the tree Figure above into TreeView and sort
the value. This tree has keys (inside the circles), Description, and
Value. Before we make the program, we prepare this tree into an array
(as in table below). The array consists of four rows. The first row
is the parent key of the node. The second row represents the key of
the node, the third row corresponds to the values of the node and the
last row characterized the description of each node. Each column denotes
each node of the tree.
| Parent Key | - | R | R | C1 | C1 | C1 | C2 | C2 |
| Node Key | R | C1 | C2 | C11 | C12 | C13 | C21 | C22 |
| Node Value | 14.2 | 15.1 | 12.3 | 16.3 | 11.4 | 19.9 | 46.2 | 12.7 |
| Node Description | Root | Child1 | Child2 | Grandchild1 | Grandchild2 | Grandchild3 | Grandchild4 | Grandchild5 |
By default, the TreeView will sort only string. To sort number correctly, they must the same digits (e.g. 11.2 and 12.45 have different digit). Thus we need to format the number before sorting it. After we sort the number, we add the description text.
1. Open a new standard Exe VB project
2. In the VB Menu Project > Components> scroll down and select
Microsoft Windows Common Controls 6.0 (check the box) and click OK button
3. Drag and drop TreeView Control into Form
4. Copy and paste the following code:
Private Sub Form_Load()
Dim nodX As Node
Dim i As Integer, n As Integer
Dim arr(1 To 4, 1 To 7)
arr(1, 1) = "R": arr(1, 2) = "R": arr(1, 3) = "C1":
arr(1, 4) = "C1": arr(1, 5) = "C1": arr(1, 6) = "C2": arr(1, 7) = "C2"
arr(2, 1) = "C1": arr(2, 2) = "C2": arr(2, 3) = "C11":
arr(2, 4) = "C12": arr(2, 5) = "C13": arr(2,6) = "C21": arr(2, 7) = "C22"
arr(3, 1) = 15.1: arr(3, 2) = 12.3: arr(3, 3) = 16.3:
arr(3, 4) = 11.4: arr(3, 5) = 19.9: arr(3, 6) = 46.2: arr(3, 7)  = 12.7
arr(4, 1) = "Child1": arr(4, 2) = "Child2": arr(4, 3) = "GrandChild1":
arr(4, 4) = "GrandChild2": arr(4, 5) = "GrandChild3":
 arr(4, 6) = "GrandChild4": arr(4, 7) = "GrandChild5"
'add the root
Set nodX = TreeView1.Nodes.Add(, , "R", "14.2 Root")
TreeView1.SingleSel = True to view the children
' put the values into nodes
For i = 1 To 7
Set nodX = TreeView1.Nodes.Add(arr(1, i), tvwChild, arr(2, i), Format(arr(3, i), "0.0"))
Next i
' sort the nodes
For i = 1 To 8
TreeView1.Nodes(i).Sorted = True
Next i
'add additional description text
'note: node 1 = root, child node start from node 2 etc.
For i = 2 To 8
TreeView1.Nodes(i).Text = "(" & Val(arr(3, i - 1)) & ") " & arr(4, i - 1)
Next iEnd Sub
5. Run the program and click the Tree.
There are many other data structures that you can learn by yourself.
Let this short introduction encourage you to learn more about the fun
of programming.
<
Previous lesson
|
Table
of Content
|
Content of this Chapter
|
Next
>