< Previous | Next | VB Tutorial | Contents >
VB Menu
In this section, you will learn how to create menu in VB6:
- Continue the MDI Form project, in the Project Window, double click the MDI Form1 to put the MDI Form in front
- In the Menu of VB, click Tools > Menu Editor or you can use
Ctrl-E. The menu Editor will appear.
- In the Caption, type &File then in the name, type mnuFile then click Next button
- In the Caption, type &Exit then in the name, type mnuExit then click right arrow button. In the Shortcut list, choose Ctrl-X, then Next button
- In the Caption, type &Window then in the name, type mnuWindow then click the Window List checkbox, and then the Next button.
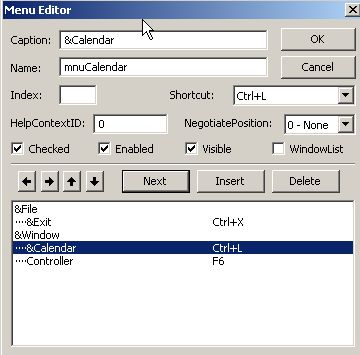
- In the Caption, type &Calendar then in the name, type mnuCalendar then click right arrow button. In the Shortcut list, choose Ctrl-L, then Next button
- In the Caption, type &Controller then in the name, type mnuController then click right arrow button. In the Shortcut list, choose F6, then Next button
- The menu editor will be the same as figure on the right. Press OK
- Now you have menu in the MDI Form, click File>Exit and enter
- In the mnuExit_Click procedure, type
Private Sub mnuExit_Click()EndEnd Sub
- In the menu of MDI form, select Window > Controller and click to wrie the subsequent code
Private Sub mnuController_Click()If mnuController.Checked = True ThenEnd Sub'now is checked, make it uncheckedElse ' now is unchecked, make it checked
frmController.Hide
mnuController.Checked = FalsefrmController.ShowEnd If
mnuController.Checked = True
- Run the program, and look at the Window menu and try the Exit menu.
< Previous | Next | VB Tutorial | Contents >
Rate this tutorial or give your comments about this tutorial
Preferable reference for this tutorial is
Teknomo, Kardi. Visual Basic Tutorial . https:\\people.revoledu.com\kardi\ tutorial\VB